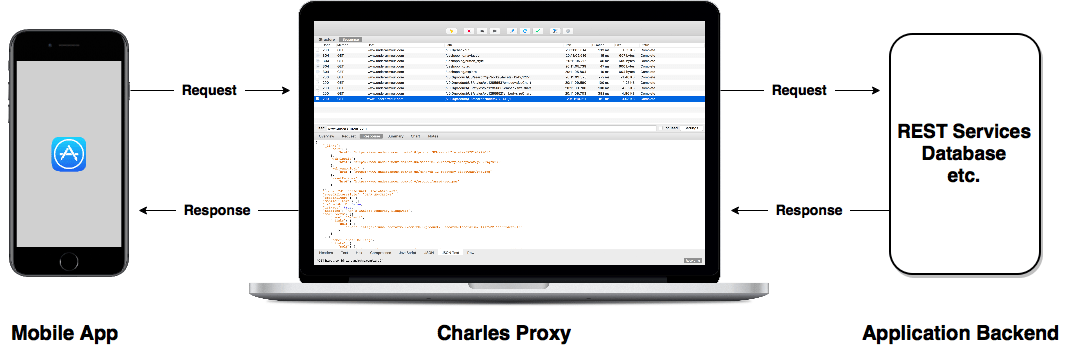
One mistake common to many mobile and web app testers is believing that the majority of testing only requires observation and interaction with the user interface (UI) itself. On the other hand, when we start to see and even manipulate what’s going on behind the scenes, more specifically the HTTP calls our app is making to the backend services that send data to and from the app, the black box of how our app functions in its entirety becomes a little more transparent. This not only allows us to learn more about how our app functions the way it does, but it also opens our eyes to an entirely new array of testing possibilities to explore.
One way we could understand more about how our app is interacting with its backend web services would be to look at the source code of our app itself. We could see what calls are being made when the user takes a certain action, a page loads, or some other event takes place. And we could see details about how the app treats the headers or payloads of these calls when they take place. Perfect approach, right? Well, not so fast. If you’re like a lot of testers having read the last few sentences, it’s possible you’re thinking one of the following things:
- “Source code? Mmmmm sounds a bit too technical for me. I’ll leave the source code to the developers, thanks.”
- “Source code? Okaaaayyy… I think I can learn this. I just hope it doesn’t take so long to learn that I run out of time to actually test this thing. Maybe if I just work late this week…”
- “Source code eh? I’ve totally got this. In fact, I’m actually a developer of sorts myself so I can easily understand this stuff. I just hope I don’t miss anything by looking at this at too low of a level.”
Wouldn’t it be great if there were a tool that could be used that would allow us to actually see and edit the HTTP calls your app is sending and receiving? This would open a whole new set of possibilities…
- We could better determine where the defects we’re seeing are actually rooted before we talk to any developers about the issues being observed. For instance, let’s say we’re testing an iOS app that displays certain achievements a user has earned. We come into the office in the morning, download the latest dev build of the app and notice the achievements aren’t displaying. Was there a regression in latest app build? Should we just assume that’s the case and go talk to the iOS developer?
The more information you have about the possible cause(s) of a defect, the less people’s time you’ll waste and the more skilled you’ll appear as a professional tester. This goes a long way in gaining respect from your development peers. Not to mention, this additional information may even point you to other issues you wouldn’t have otherwise discovered.
Instead, why not first see the result of the achievement REST service call that the app made? Did the achievement information come back in the response? Did the response come back at all? Depending on this, we’ll be able to make a much better determination of whether or not we should follow up with a backend developer, the iOS developer, or someone else entirely.
- We could step in and manipulate requests and responses to see how our app reacts to different backend behavior. In the last example, let’s say the issue was rooted in the backend. Well, we still need to continue to test the mobile app on the frontend. Do we wait for the service to be fixed and deployed, delaying our testing and possibly delaying the discovery of other defects in the mobile app? Instead, why not set a breakpoint and rewrite the response to be correct or even map the entire response to a local file so we can continue testing?
- We could simulate different network connection quality and speeds. Does our app behave in the same way on a lossy 3G connection as it does on the 150+ Mbps Wi-Fi connection that’s serving the team full of developers in our tech office? You’d be surprised what you can find just by throttling your network connection to something more in line with only having one or two bars in the basement of a parking garage.
Luckily, there is such a tool. And if you’ve gotten this far without actually reading the title of this post, it’s called Charles Proxy.
Here’s how to get started…
Setting up Charles Proxy
STEP 1:
We’ll first need to download and install the latest version of Charles. Once installed, we’ll need to take some set up steps to get up and running. For the sake of this post, I’ll be detailing the setup and usage steps on macOS and iOS, however the general concepts apply to other operating systems as well.
STEP 2:
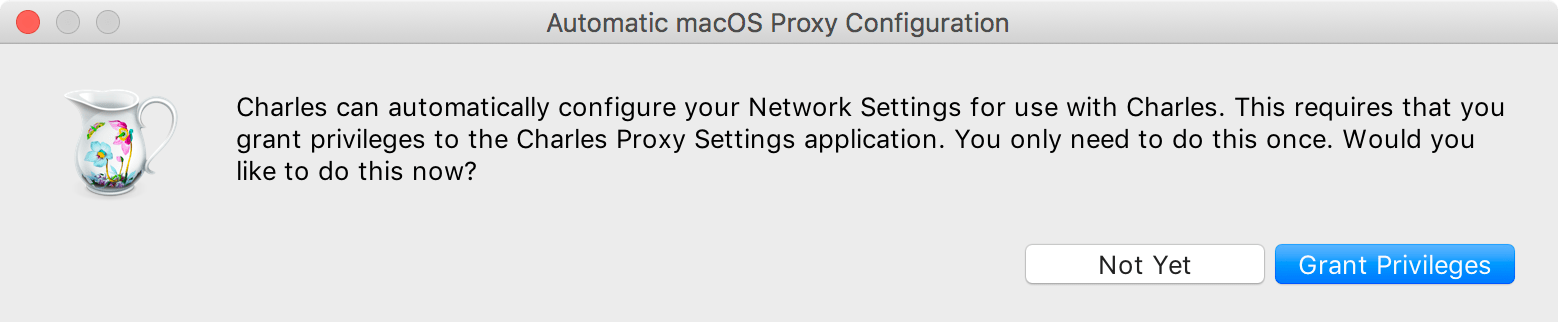
Launch Charles from your Applications folder. You’ll see the message below appear where you can Grant Privileges and then enter your system user password to confirm.
STEP 3:
We need to install the Charles root certificate on the computer running Charles as well as on our mobile device. This will allow us to access the SSL traffic that is being proxied through Charles.
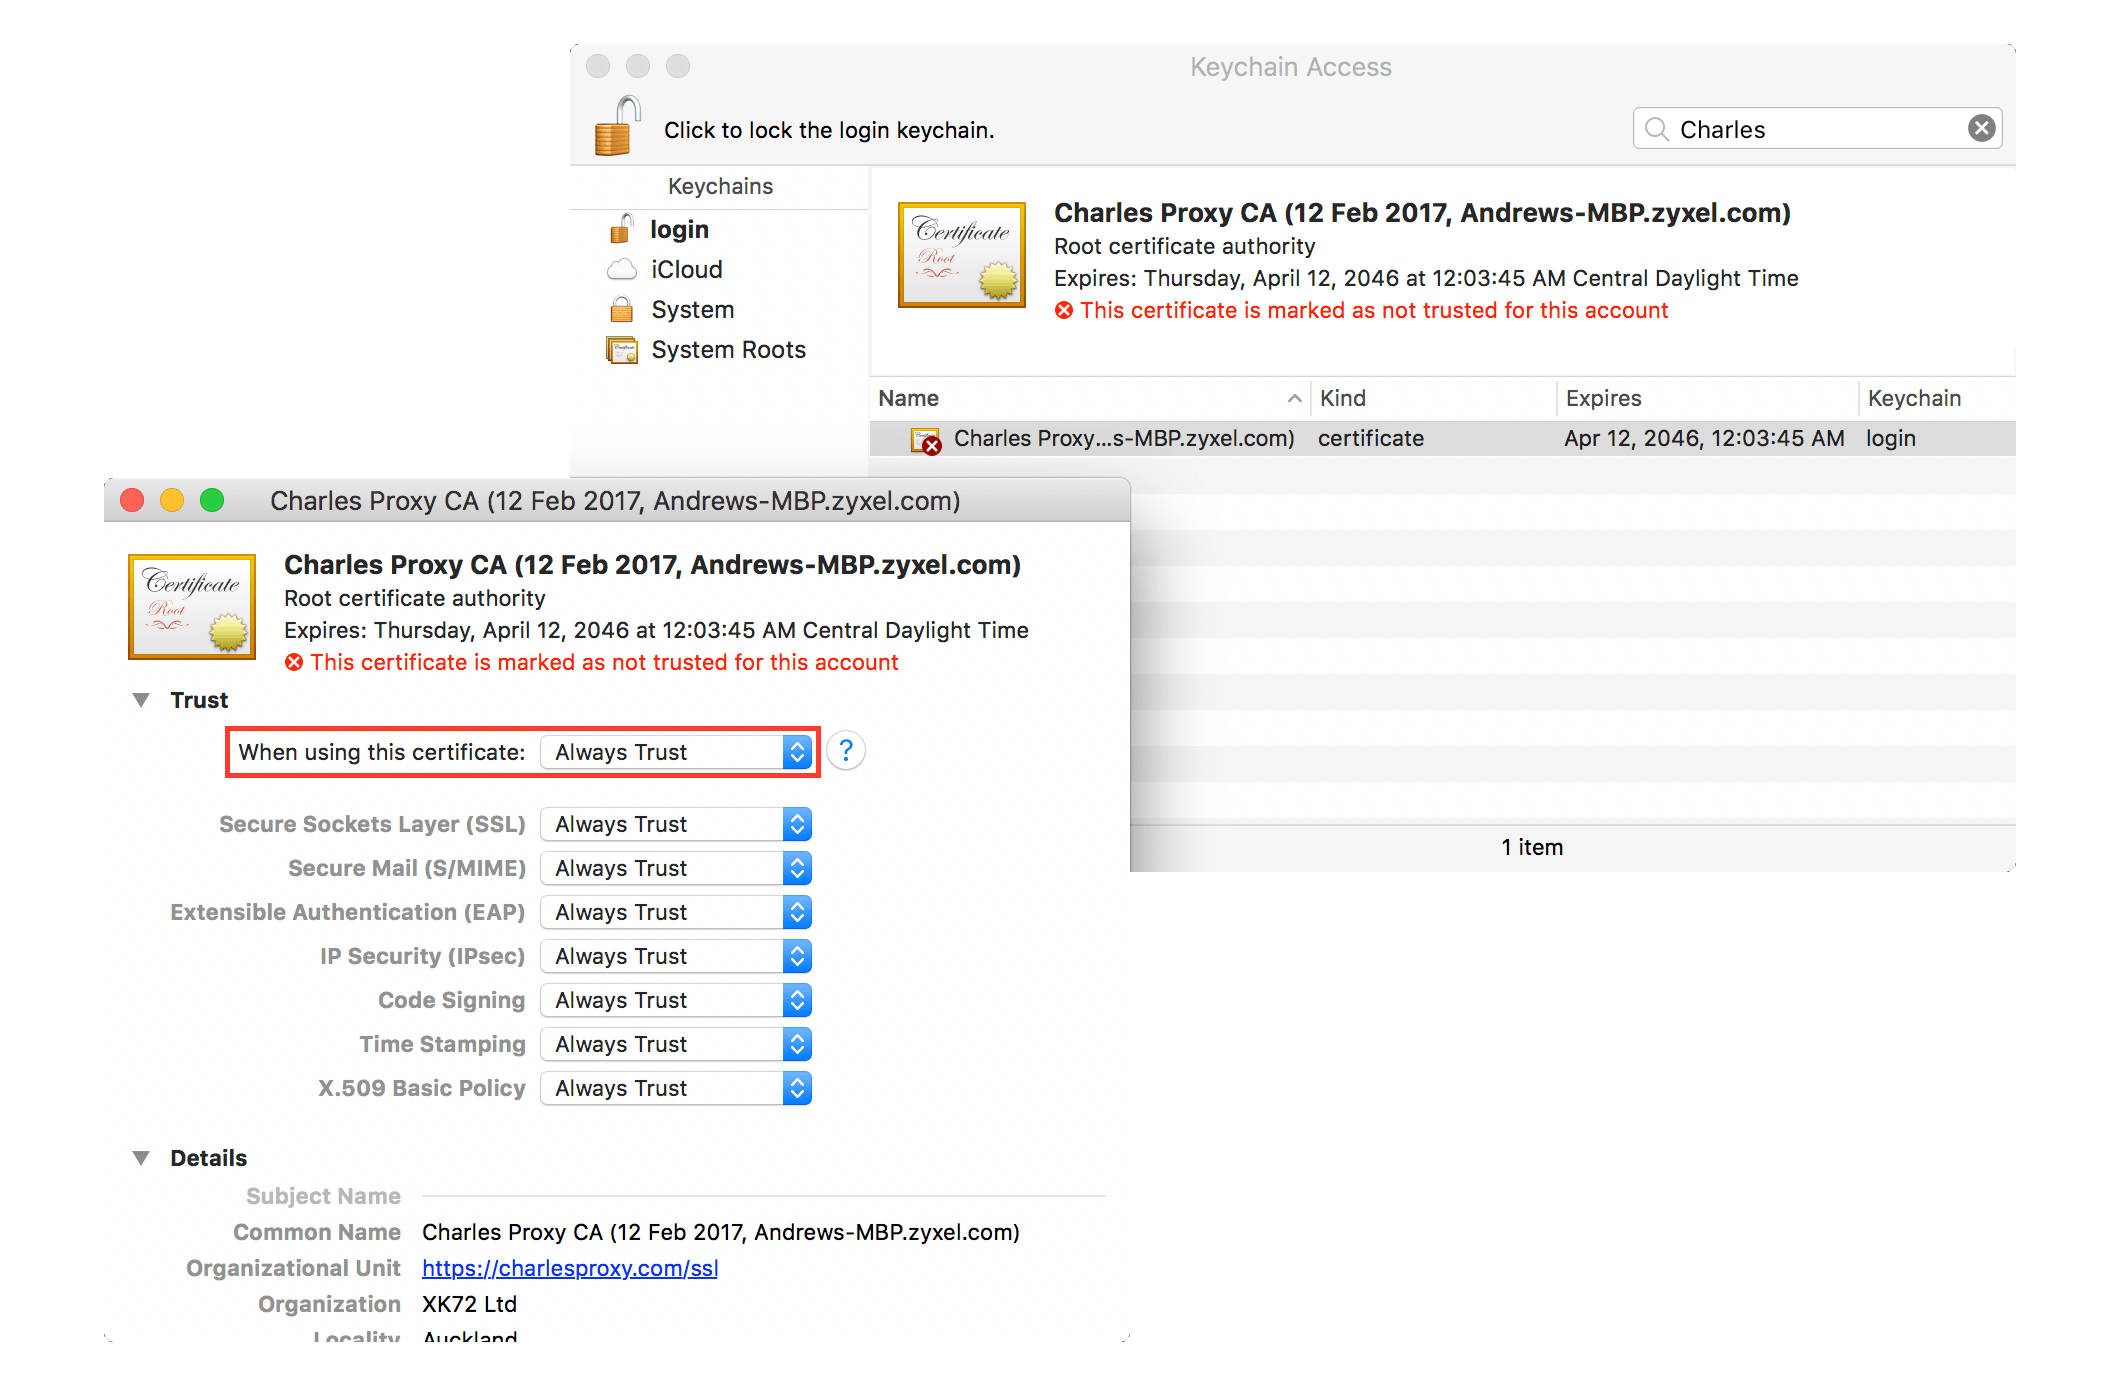
Download and import the Charles root certificate to your Keychain on macOS by selecting Help > SSL Proxying > Install Charles Root Certificate. As you can see, this certificate is not trusted by default so we’ll need to make some changes.
Double click the name of the Charles certificate to open the certificate details window. Expand the Trust section and select Always Trust from the When using this certificate: drop-down list. Close the certificate details window and enter your password once again to confirm your changes. You should now see that the Charles certificate is marked as trusted.
STEP 4:
If you’re using a physical iOS device…
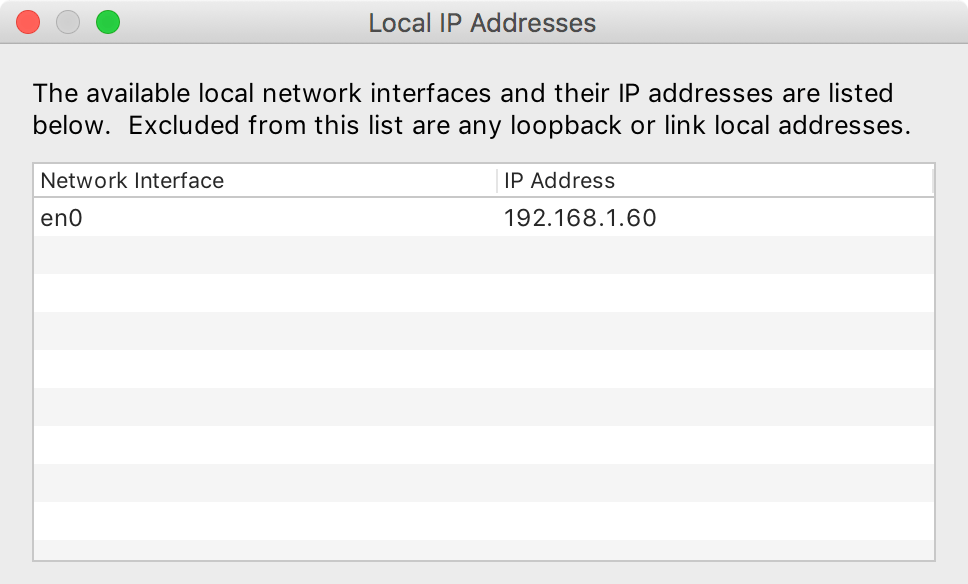
In order to set up our mobile device, we first need to know the local IP address of our computer. In Charles, select Help > Local IP Address to display this information. Your local IP address can also be found under Apple > System Preferences… > Network.
Now that we know our computer’s local IP address, we need to connect our mobile device to the same network, and then set the appropriate proxy settings on the device. Once both devices are connected to the same network, tap on the info button of the connected network in iOS Settings > Wi-Fi to open a page with more details on your network connection. Under HTTP PROXY select Configure Proxy > Manual and enter the local IP address you found above in the server field and 8888 for the port. Tap Save to apply your changes.
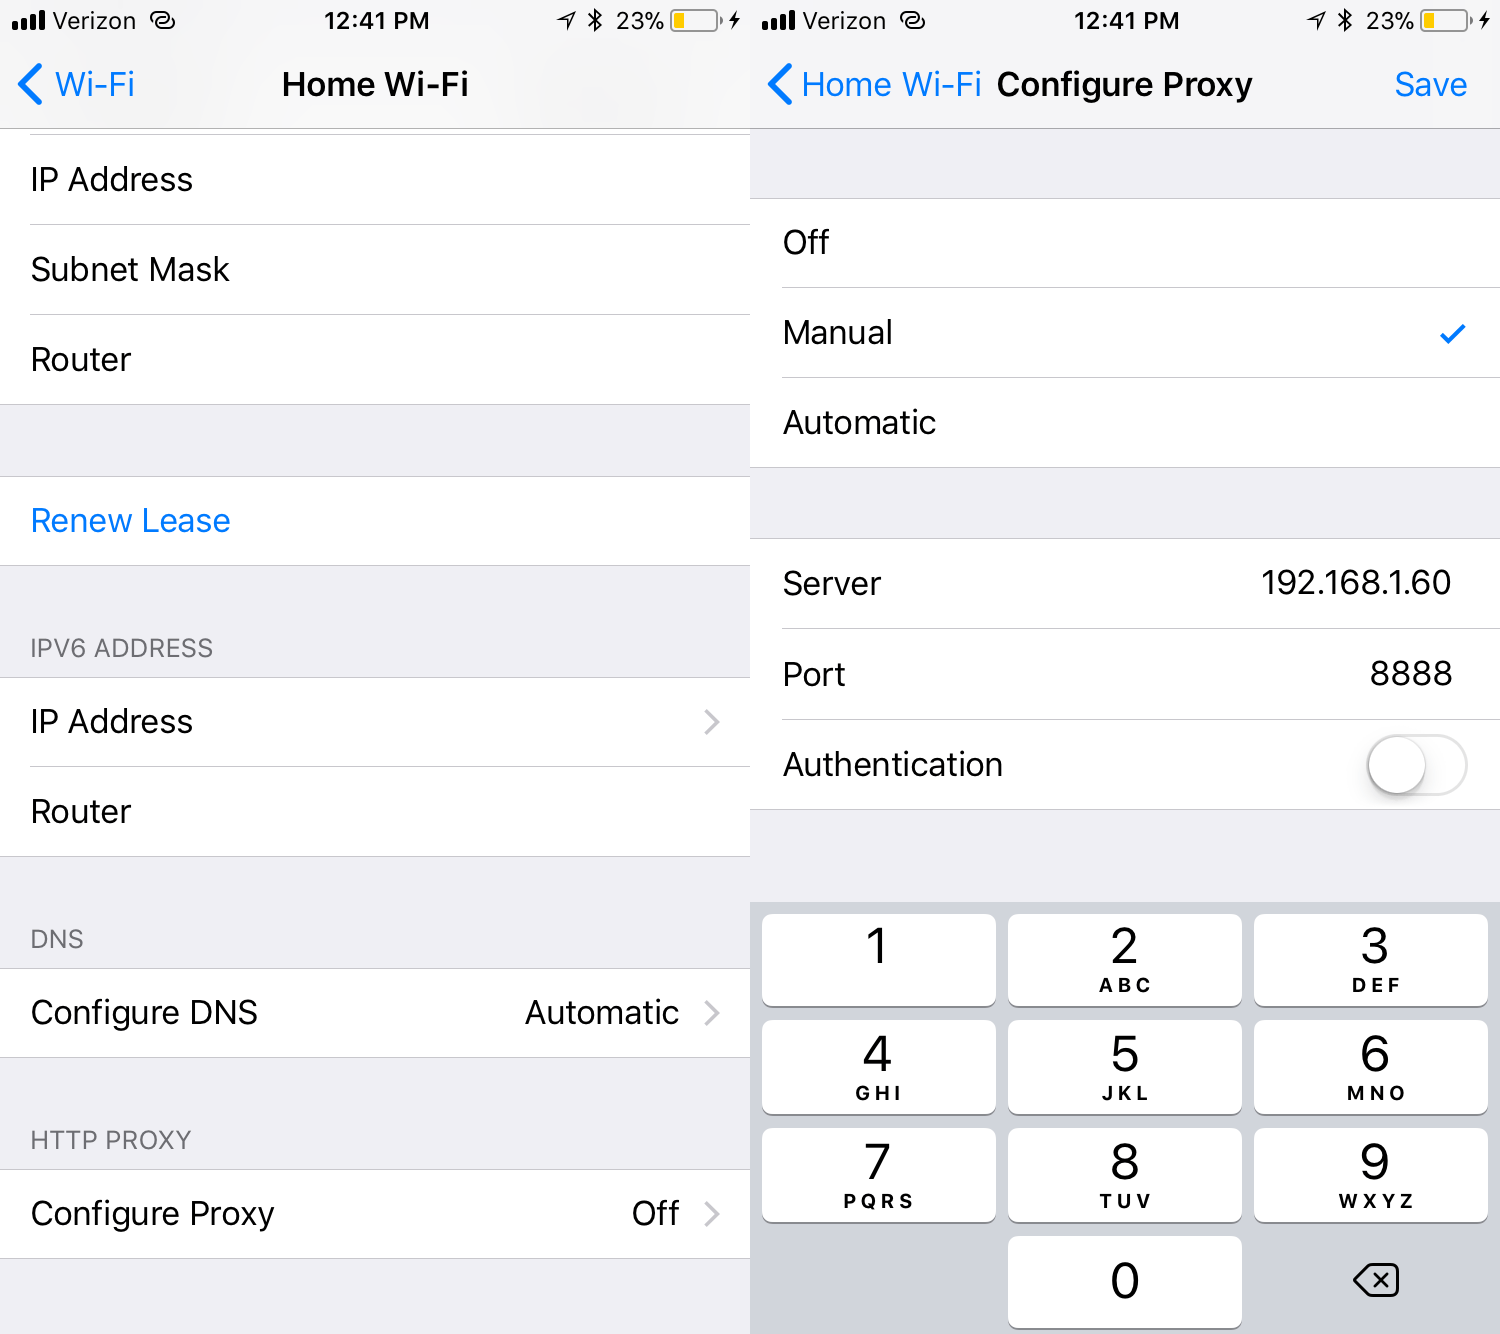
8888 is the default port for Charles. If this presents a conflict, you can change this setting in Charles under Proxy > Proxy Settings….
Once this is set, we need to install the Charles root certificate on our mobile device. To do so, launch iOS Safari on the mobile device and navigate to chls.pro/ssl. The Charles certificate will download to the device and bring you to the Profiles & Devices Management page in iOS Settings to install the certificate. Tap Install in the upper right corner and follow the prompts to install the certificate on the device. Once complete, tap Done to be brought back to iOS Safari.
If you’re running a later version of iOS 10 or newer, you’ll also need to enable Certificate Trust Settings for the Charles root certificate on the device. This can be done by navigating to iOS Settings > General > About > Certificate Trust Settings and toggling the selector for the Charles Proxy root certificate to be enabled.
At some point during the Charles root certificate installation on our mobile device, we’ll see the following message in Charles:
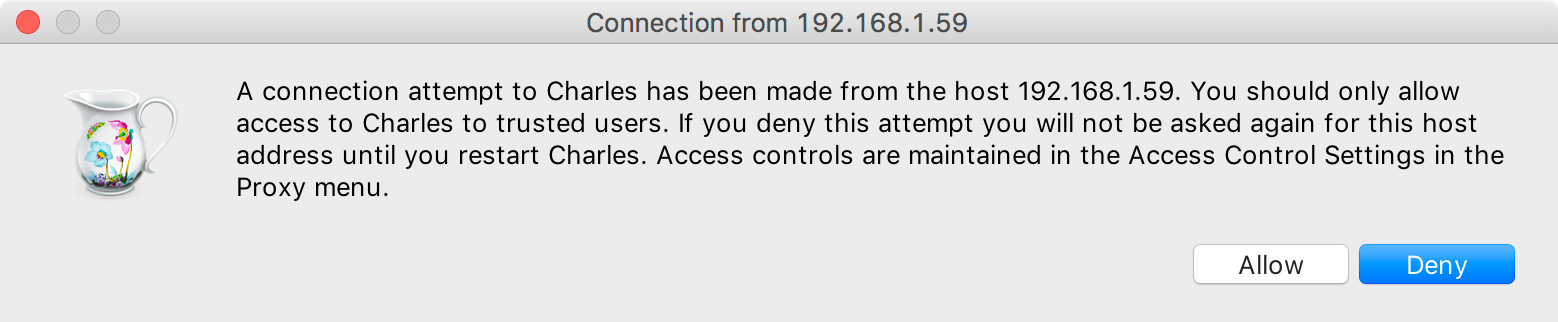
This is to allow the device permission to utilize Charles on our computer as a proxy. Click Allow.
If you’re using iOS Simulator…
Charles features a very simple installation process of the root certificate for iOS Simulator. To install, simply navigate to Help > SSL Proxying > Install Charles Root Certificate in iOS Simulators. Click OK and that’s it!
In case you missed it… The confirmation message stated that if Simulator traffic doesn’t appear in Charles, please try running Charles before you run the Simulator.
Now that we have our certificates installed, let’s enable SSL Proxying so we can see all the details about our HTTPS traffic.
STEP 5:
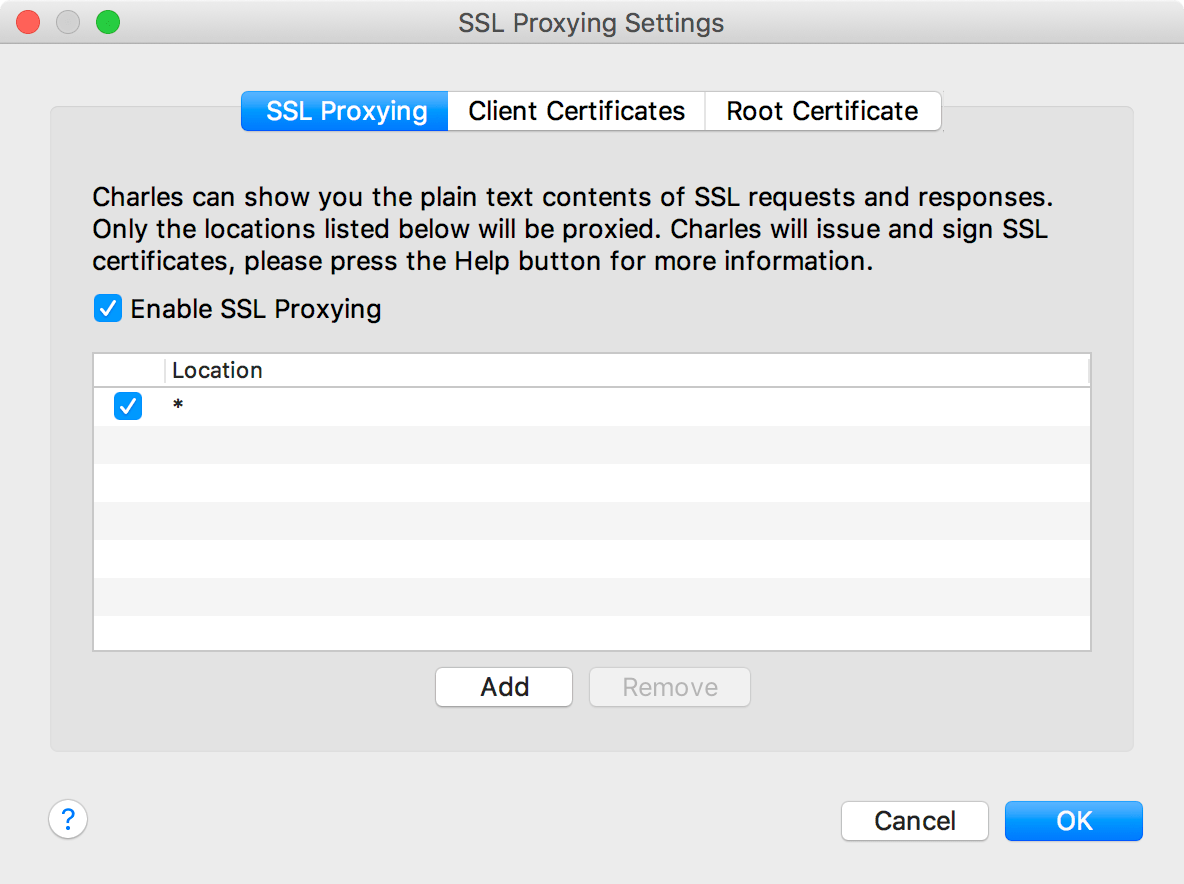
To enable SSL Proxying, navigate to Proxy > SSL Proxying Settings… and ensure that the Enable SSL Proxying checkbox is selected. At this point, I’d also recommend reading the description of the dialog box as well as clicking the help question mark in the bottom left corner for additional info. There’s some important stuff here that you don’t want to miss.
We’ll choose to enable SSL Proxying for all locations by clicking Add, entering a single wildcard character ( * ) in the Host field, leaving Port empty, and then clicking OK. When finished, our SSL Proxying Settings should look like this:
STEP 6:
Let’s quickly set a couple more things that will make life in Charles much easier for us. From the menubar, select View > Sequence. This will allow us to see the calls sequentially as they are made. Next, select Charles > Preferences…, select the Viewers tab, deselect Combine request and response, and set the Time drop-down to milliseconds.
I encourage you to take some time later on to familiarize yourself with these options (including the Structure view) and use the options that work best for you.
Click OK to return to the main Charles window and LET’S START TESTING!
Observing HTTP Requests and Responses
The basic functionality of Charles Proxy is centered around the HTTP requests and responses between our app or website and the backend services that provide it with information. For the purposes of this post, I’m going to be using the UA Shop app from Under Armour. Now is a good time to mention that I have no affiliation with Under Armour and have chosen their app only for the purposes of demonstrating what we can do with Charles Proxy. I would recommend that you follow along and explore each of the examples below using your own app where you can.
Now that we have Charles set up properly, let’s launch our app, perform some actions, and take note of the traffic we see in the session window.
For this example, we’ll navigate to UA Shop’s search feature and search for “Socks”. As you can see below, there’s quite a bit happening in Charles so let’s unpack this…
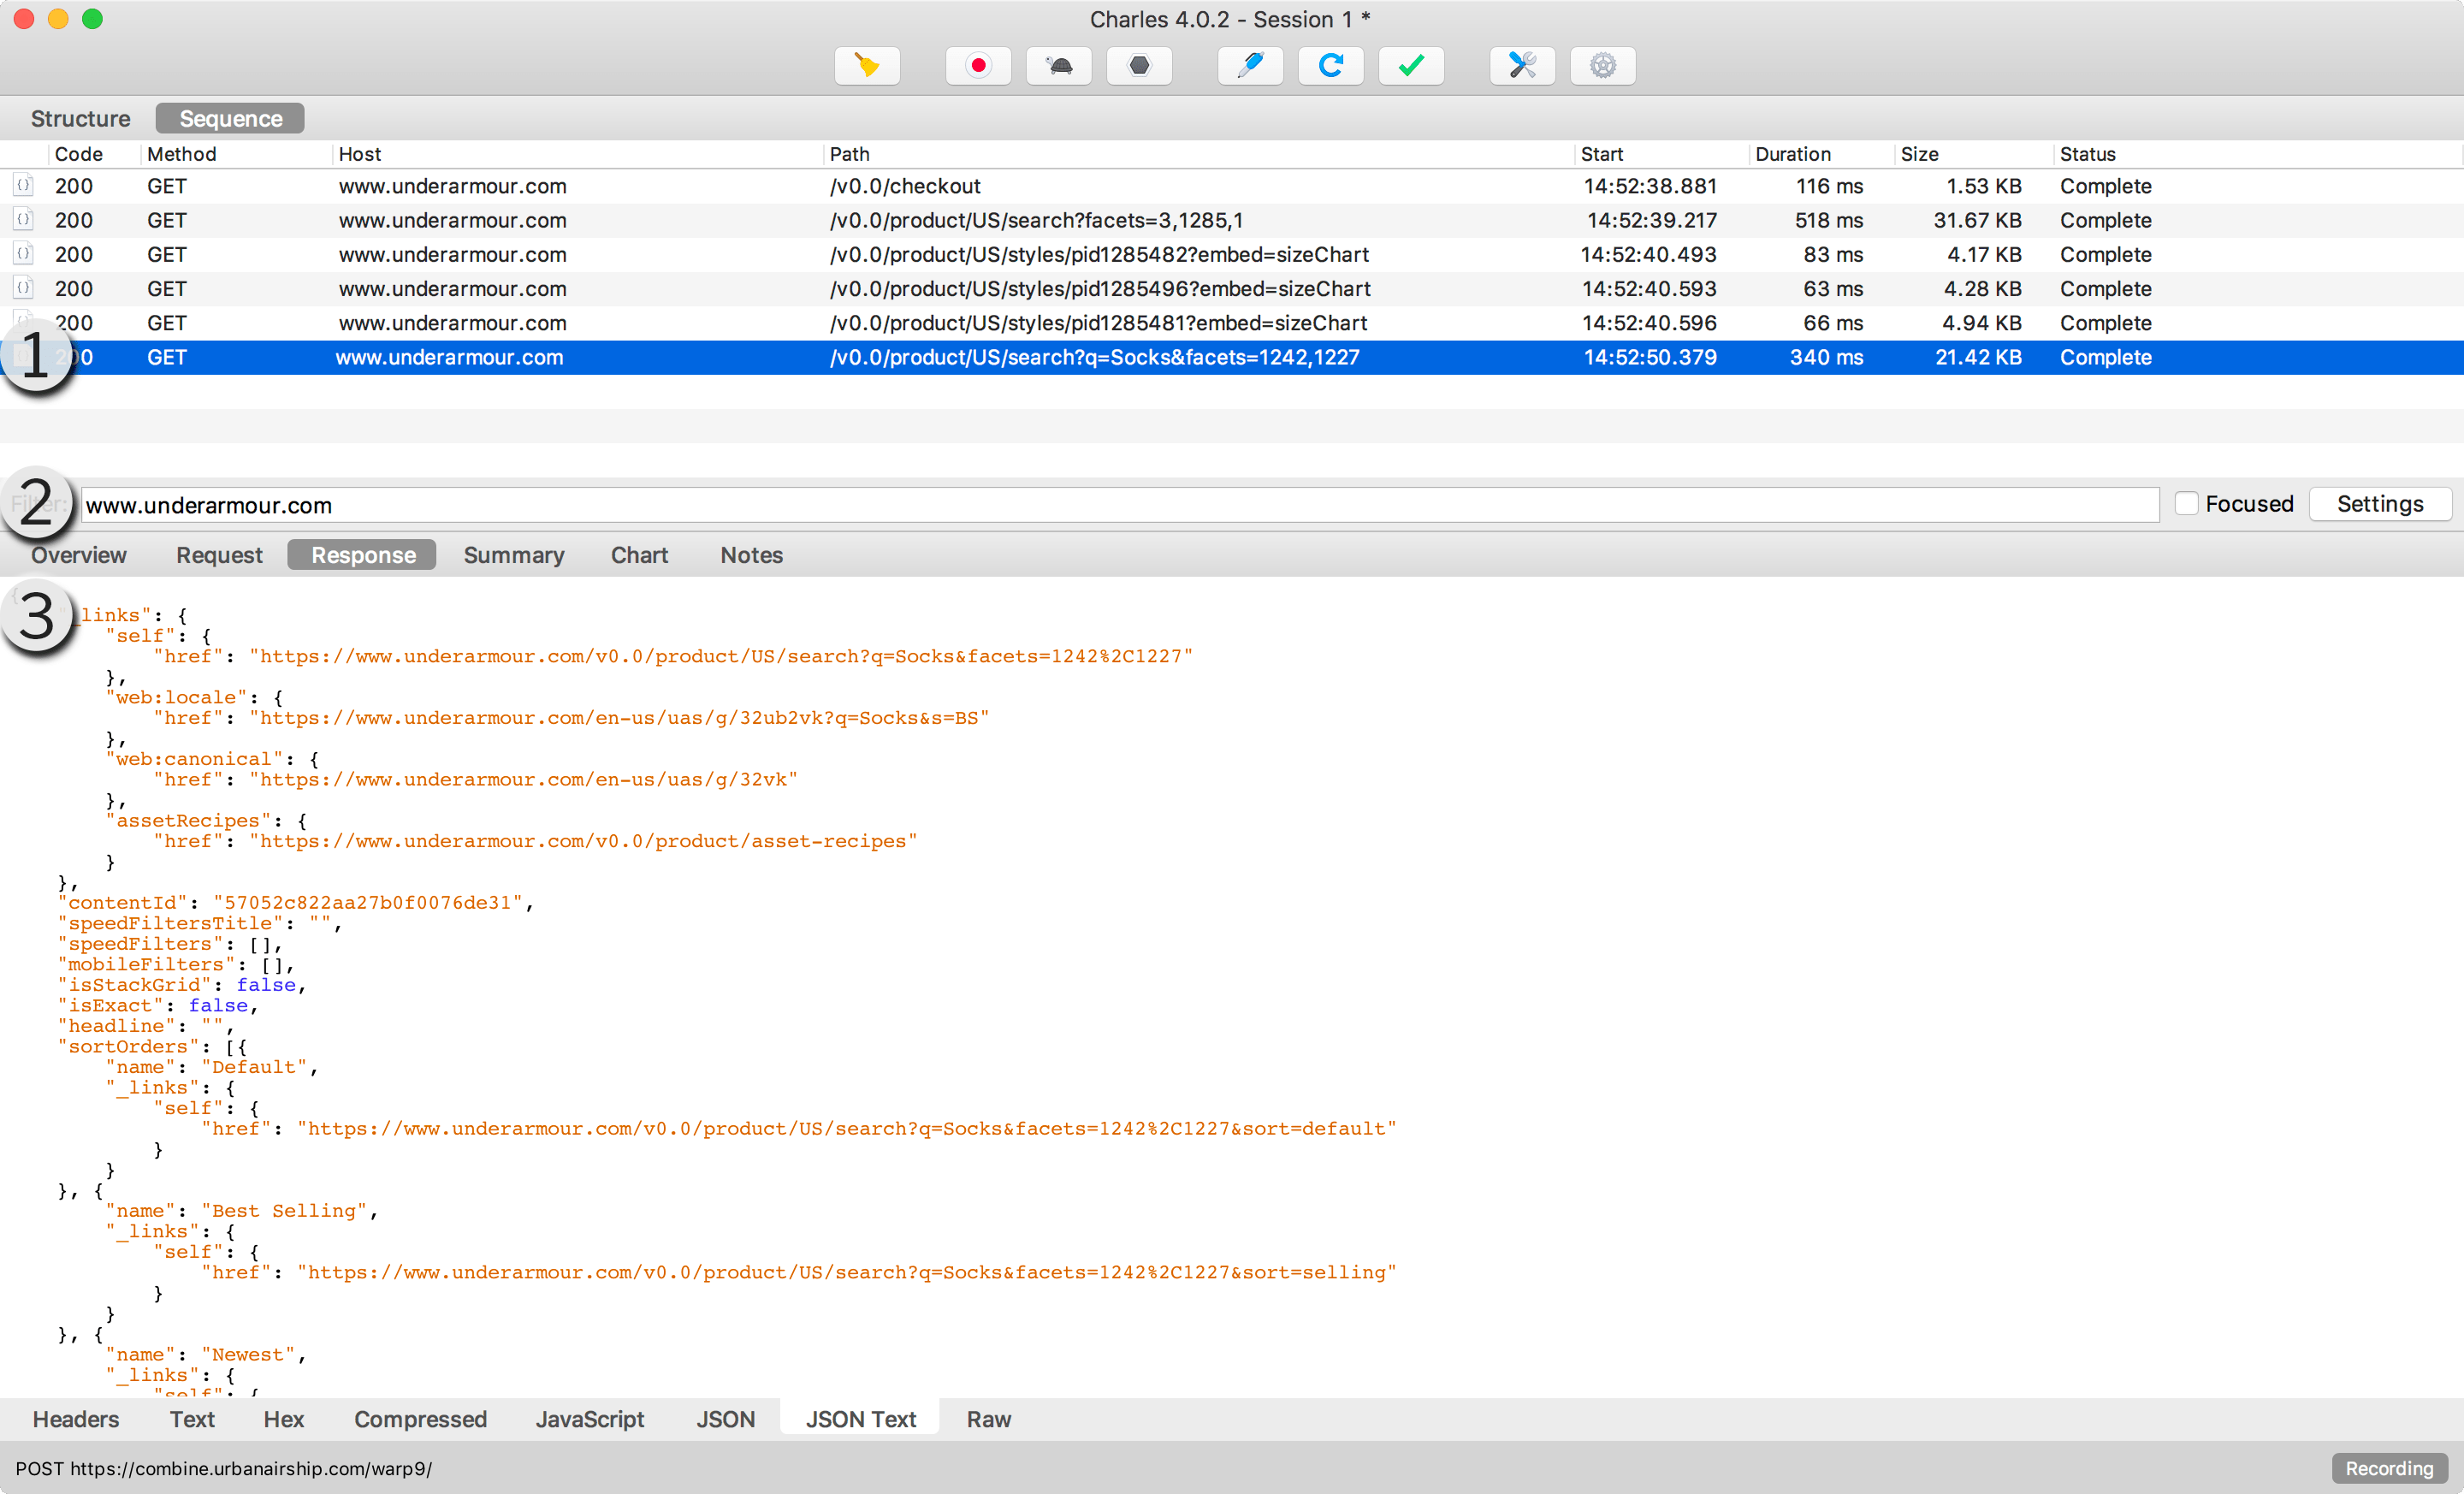
- We can see that the endpoint for the search is
www.underarmour.com/v0.0/product/US/search?q=Socks&facets=1242,1227. This looks like a pretty straightforward GET call to a search endpoint using our search term as a query parameter.
Whenever I see input being passed into a query string from something like a search field, I like to check all sorts of inputs. Search terms that contain characters that need to properly encoded in the URL such as ampersands (&), search terms that are either partially or entirely made up of regular expressions, etc., are all prone to being mishandled by the application. Charles let’s us see exactly what query parameters are being passed so we easily test these different scenarios.
- By now, all of this network traffic coming from our device and from our computer is leading to a lot of unnecessary noise in our Charles session. To reduce this, we’ll use the Filter field. With this set as shown, we’ll only see traffic that contains
www.underarmour.comin the Host or Path.
Selecting Settings to the right of the Filter field gives us even more control by allowing us to enable the Filter uses regex setting. If you’re only testing on an external device and not in a web browser running on the same computer as Charles, you can further reduce session noise by unchecking macOS Proxy… under the Proxy menu. Eventually, you may find that clearing the entire session is necessary. This can be done by selecting Clear Session under the File menu.
- To see the JSON response to our search, we’ll select the Response and JSON Text tabs. Scrolling through this JSON response, we can begin to see how certain values within the response body correspond to elements in the UI. This can be seen below in the selected JSON attributes I’ve taken from the response body and the accompanying screenshot.
"totalCount": 129
...

"content": {
      "name": "UA Charged Cotton® 2.0 No Show Socks – 6-Pack",
      "shortName": "UA Charged Cotton® 2.0 No Show 6-Pack",
      "bullets": [],
      "categoryName": "Men’s  Sock"
}
...

"priceRange": {
          "base": {
            "min": 19.99,
            "max": 19.99
          },
          "msrp": {
            "min": 19.99,
            "max": 19.99
          },
          "currency": "USD"
        }
...

Now that we’re able to view the HTTP requests and responses, and have even seen how some of the attributes in our JSON response map to elements in the UI, it’s time we leverage some tools in Charles to actually modify the requests and responses that are being sent and received.
Modifying HTTP Requests and Responses
Let’s make sure we’ve got a basic mental model of the flow that takes place when we’re proxying through Charles. The request will be triggered by some event or action that we initiate in the mobile app, sent through Charles as our proxy, and received by the backend. It is then processed by the backend services where a response is created. That response is finally sent back to the app passing through Charles along the way.
Breakpoints
Charles has the ability to set breakpoints for calls. We can choose to set a breakpoint on the request (i.e. after a request has been sent from the app but before the request is received by the backend), on the response (i.e. after the response has been sent by the backend but before the response is received by the app), or both.
We first need an example for the purpose of illustrating how breakpoints in Charles work. Our example doesn’t need to be all that complex, but once you understand how breakpoints work, be on the lookout for opportunities in your own real-world scenarios where they can serve your testing needs.
Let’s say we want to set a breakpoint for the call that executes a search in the UA Shop app that we’ve been using. We’re going to use this breakpoint to change the "totalCount":129 in the response in a couple of different ways.
We’ll create our breakpoint by navigating to Proxy > Breakpoint Settings…, selecting the Enable Breakpoints checkbox, clicking Add, and then entering the information about the call for which we would like to set a breakpoint.
Again, the URL for a search call (specifically for “Socks”) is https://www.underarmour.com/v0.0/product/US/search?q=Socks&facets=1242,1227 so our breakpoint setting will look like this:

- Note that some fields are intentionally left empty. Any empty field will match against any value that is passed. For example, the breakpoint settings in the image above will only apply to a search for “
Socks”
as this is specified in the Query field. However, if the Query field were to be left blank, this breakpoint would be applied to a search call for any item as the breakpoint would look to match against the Host ofwww.underarmour.comand the Path of/v0.0/product/US/search, but not take into account what Scheme, Protocol, Port, or Query is used. - Wildcards ( * ) are also supported here and in many other tools in Charles. For instance, if Under Armour were to come out with version v1.0 of this service, and we were testing multiple versions of the app (some using v0.0 and some v1.0) but didn’t want to create multiple breakpoints, we could enter a Path of
/v*/product/US/searchand the breakpoint would apply regardless of whether v0.0 or v1.0 was called. - We’ve also set the breakpoint to only apply to the response. In this example, we don’t want to change anything about the request, so we won’t waste the time setting a breakpoint there. We’ll let the request pass through Charles uninterrupted to be processed by the backend, and then step in with a breakpoint and change the response prior to it being received by the mobile app.
When the call is executed and the breakpoint is invoked, we’re shown the Breakpoints view in Charles right away. From here, select the Edit Response tab, select JSON from the lower tab bar, double-click the value next to totalCount
to insert our own value of 175, and then click Execute.

Check it out! Our new value of 175 is showing in the UI.
Now let’s repeat our search and this time rewrite the original value of 129 (integer) to “129″
(string).
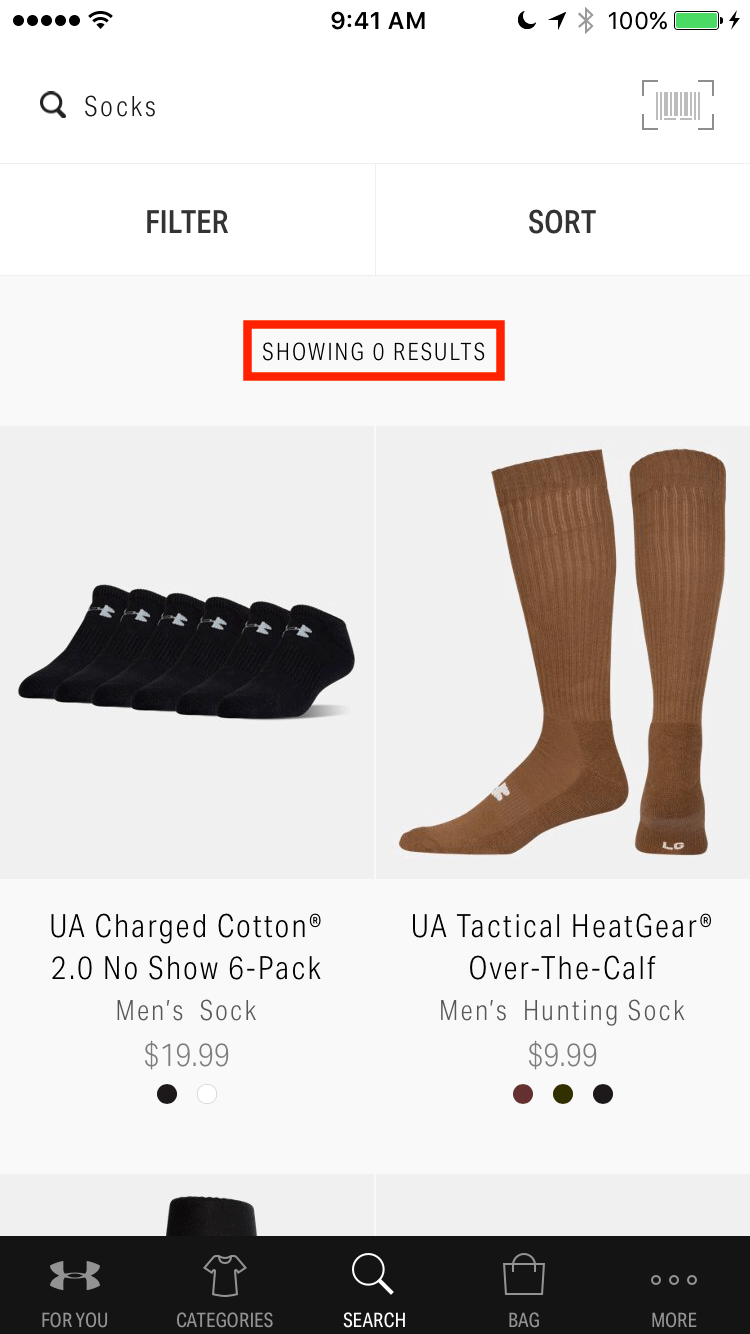
And there we go! The UI element now says SHOWING 0 RESULTS because we passed in “129” as a string and not an integer. This tells us that the mobile app only supports this value coming back as an integer.
Breakpoints Tip:
A quicker way to create a breakpoint in Charles requires the call to have been made at least once within the current session. If that’s the case, right-click on the call in the session view and select Breakpoints from the context menu that appears. This will create a breakpoint on the request and response of that specific endpoint. This can then be editted as needed from Proxy > Breakpoint Settings….
When Not to Use Breakpoints:
- If you have a lot of changes to make in a single request or response, they could take too long to make causing the app to respond as if the call timed out.
- If you need to make edits for many calls that happen in succession (e.g. if you’re modifying a header value or perhaps the API version in the URL for every call, regardless of the specific endpoint being called), it will be very inefficient to have to manually make these changes for every call.
If either of these are the case, there are other tools we can use to more efficiently modify requests in Charles.
Rewrite Tool
The Rewrite tool can be used to define changes to one or more calls in advance and have them apply at runtime. In the next example, let’s take a look at how UA Shop responds to receiveing a 503 Service Unavailable response to the search request.
Creating a Set
We first need to define our Rewrite rule. Navigate to Tools > Rewrite… and select the Enable Rewrite checkbox. Click Add to create a new rule set and enter 503 Service Unavailable
in the Name field to rename the set.
Defining the Location
Next, we need to define the location or the call that invokes the rule. We only want our response to be rewritten to 503 Service Unavailable when the search endpoint is called. Therefore, we’ll enter a location that matches only the search endpoint by clicking Add under the Location list and entering www.underarmour.com in the Host field and /v*/product/US/search in the Path field. As you can see, we’re able to utilize wildcards and empty fields as needed.
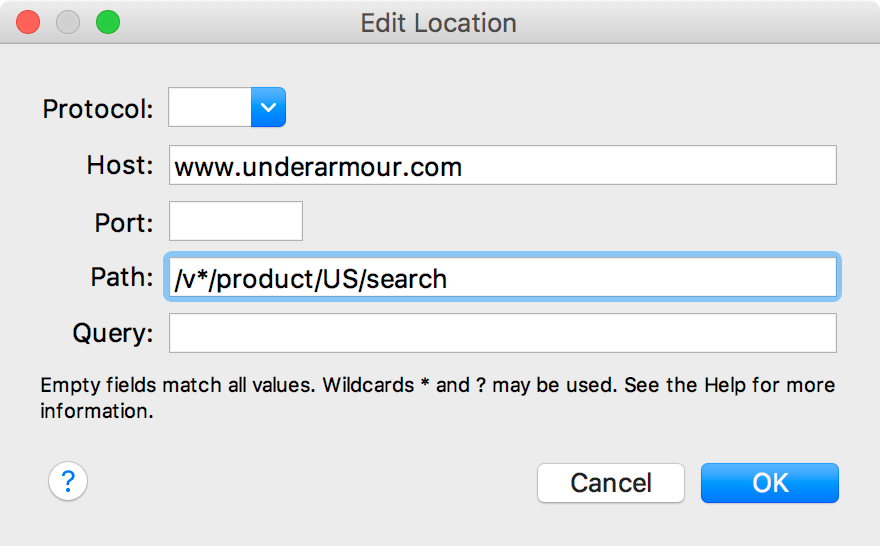
Click OK to close the Edit Location window..
Creating Rules
Now that we’ve defined the location, we need to define the rule itself by clicking the Add button under the Rule list. Click the Type drop-down list and take note of all the types of rewrite rules you’re able to create. I’d encourage you to take some time to try each of these types just to get the feel for what Charles is capable of doing. Keep in mind that you can create multiple rewrite rules that are applied at once! I’ve found this to be one of the most powerful features in Charles as it has allowed me to test scenarios that I would have no way of testing otherwise.
For now, let’s just chose a Type of Response Status. Then, in the Match section Value field, we’ll enter “200 OK” (without quotes), in the Replace section Value field, we’ll enter “503 Service Unavailable”, and finally select Replace All.
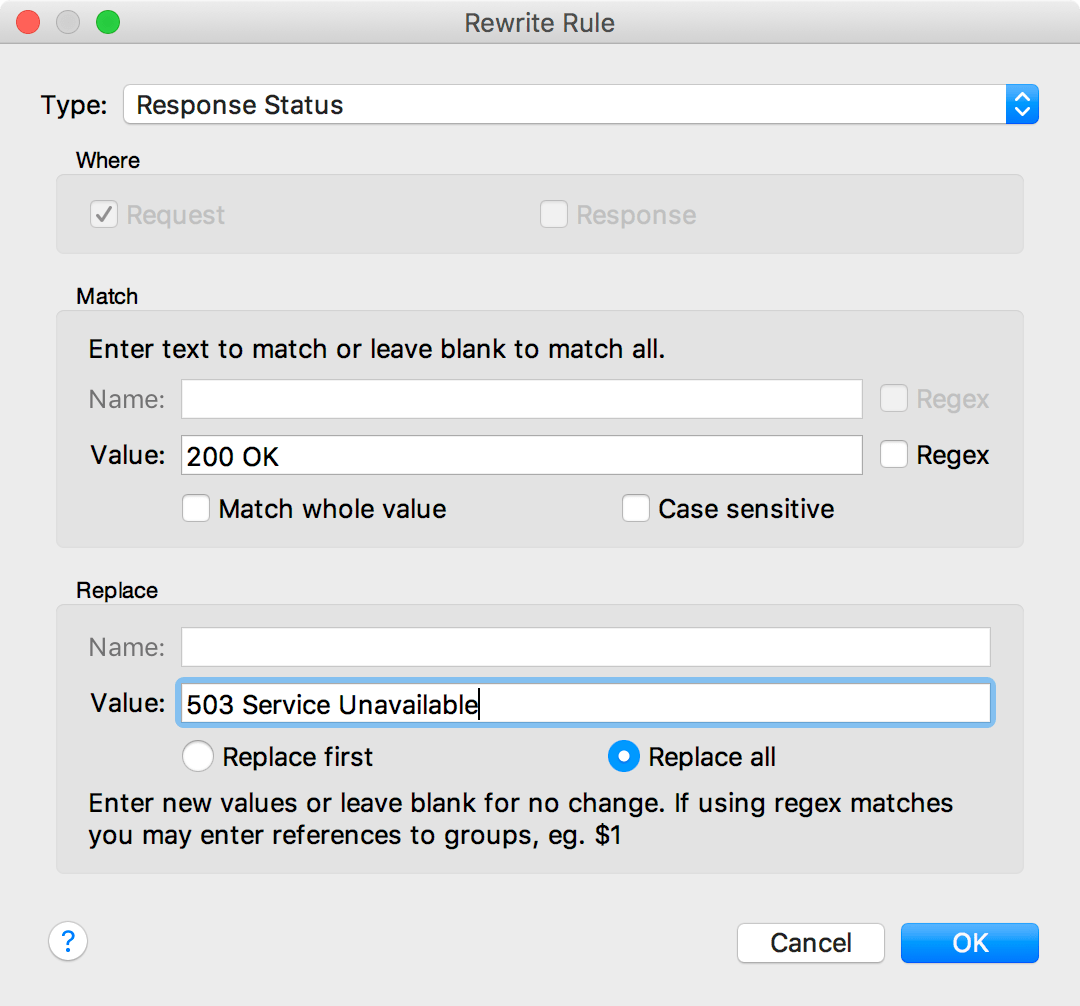
Once your rewrite rule looks like the one above, click OK.
Because we don’t want to pass the original response body to the app (this would not be realistic for a 503 response), let’s create another rule in this set to replace the response body with some static text. Oftentimes, there is a predefined response body that will be returned for certain response statuses. You should be able to get this response body from a backend developer or someone on your DevOps team. But for now, we’ll just be using the static text “Service Unavailable”.
Under the Rule list once again, click Add. From the Type drop-down list, select Body and then select only the Response checkbox. Leave the Match section empty so that the entire response body, no matter what the content is, will be replaced. In the Replace section in the Value field, enter “Service Unavailable” (again, no quotes) and select Replace All.
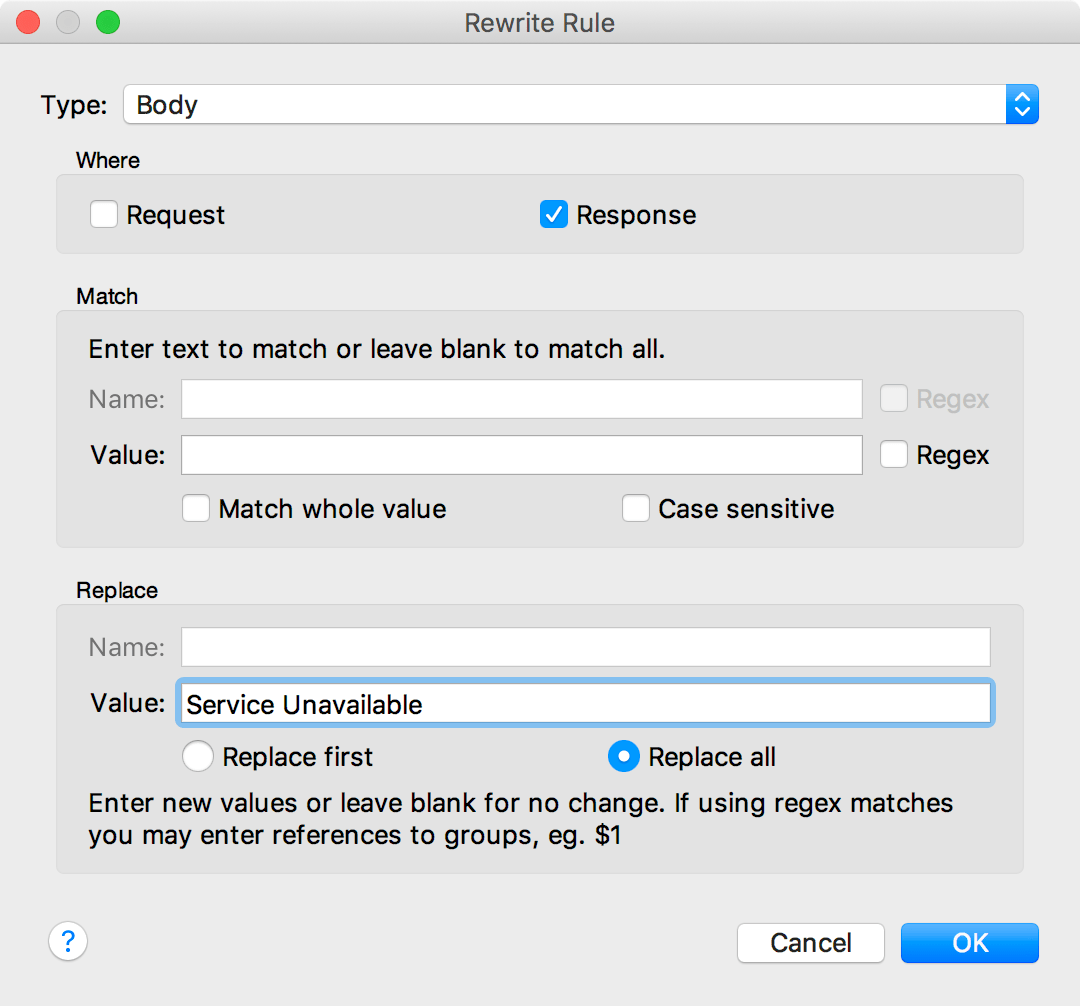
Once again, if your rewrite rule looks like the one above, click OK.
Let’s review… We created a rewrite rule that is invoked whenever the search endpoint is called, rewriting the response status where it’s normally 200 OK to a status of 503 Service Unavailable and replacing the response body with “
Service Unavailable”.
Click Apply/OK and let’s try it out by executing another search.
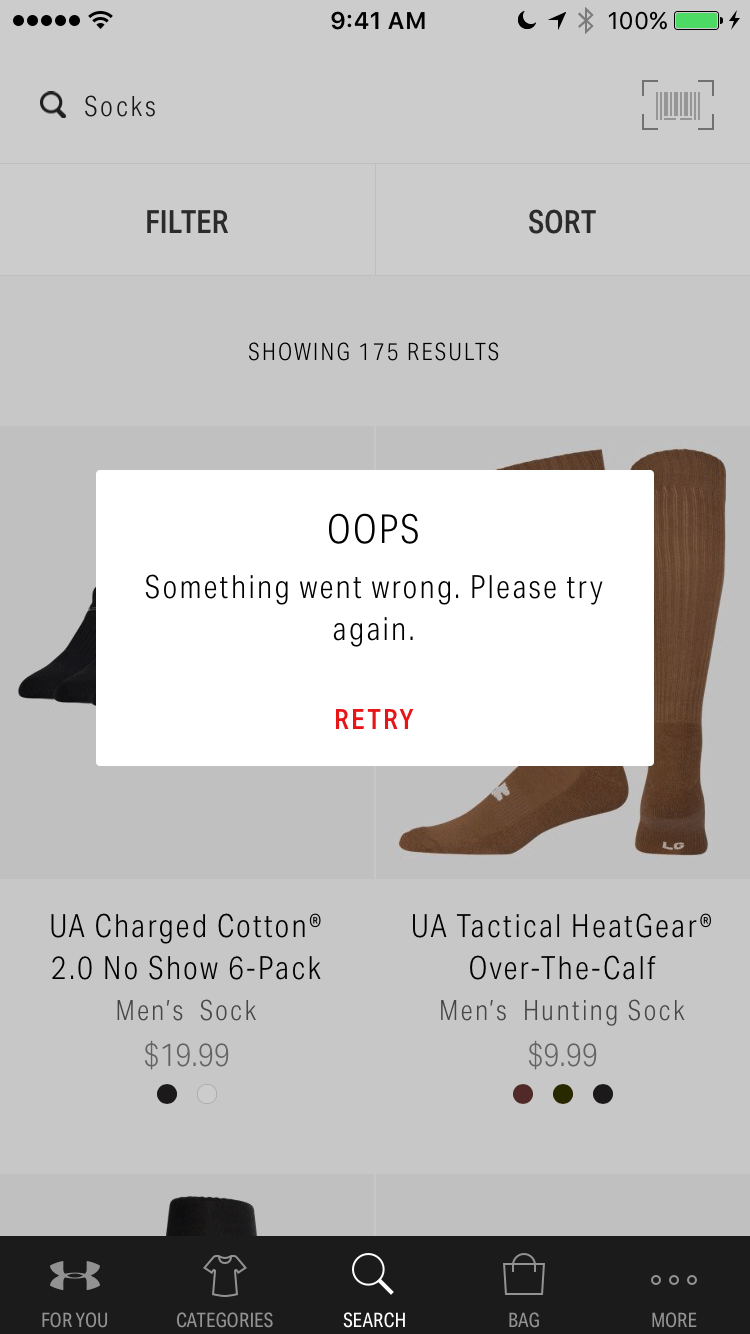
Take a look at that! We see a generic error message in the app triggered by the 503 response and can see in Charles that our response body was replaced as well.
Map Local
Another way to manipulate the response body for any call is to use the Map Local tool. This allows us to prepare a response body ahead of time, and then simply direct Charles to use that file for the response to our call at the time the request is executed. While it’s a bit of prep work up front, this saves us a lot of time during execution over using breakpoints, and allows for more complex changes to the response body than we could easily do with the Rewrite tool.
It’s important to remember that when Map Local is being used, the call doesn’t ever reach the application’s backend so we cannot expect data to be in the same state as if it did. For instance, say we’ve enabled Map Local for the call executed when we add an item to the cart. When that action is taken, Charles will serve the native app the response from our local file but the request will never actually make it all the way to the backend. Therefore, when we navigate to our shopping cart in the app, the item will not be there. If this presents an issue given the context in which you’re testing, it’s best to rewrite the response body using the Rewrite Tool.
Creating a JSON response body
Let’s take the standard JSON response from the search request as a starting place. We’ll first turn off all breakpoints and rewrite rules from the previous examples and then execute another search request. Next, let’s copy the entire JSON response body and paste it into a new file in a text editor. Within our text editor, we’ll make some changes to several values in the JSON response that we can easily identify within the UI. Let’s set the totalCount to 190 this time and also change the priceRange.base.min and priceRange.base.max values to 17.99 for the first result. I can tell from looking at other products in the search results, changing the values in this way will show the first product as being on sale. We’ll save the response to the desktop (or some other easy to find location) with the filename of search.json.
Now that we’ve created our custom JSON response, let’s create the Map Local setting in Charles that will allow us to use this JSON file.
Map Local settings
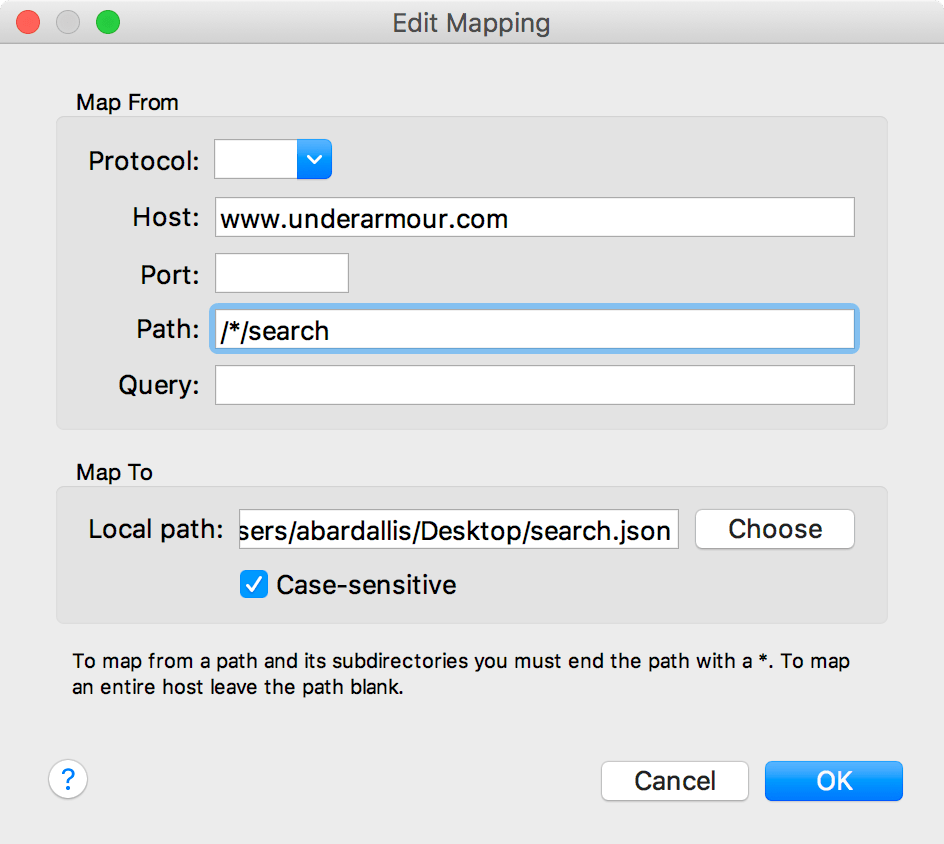
Navigate to Tools > Map Local… and select the checkbox to Enable Map Local. Click Add and once again, enter the correct Host and Path, and the correct Protocol, Port and Query if necessary. Next to the Local path field, click Choose and select the search.json file you just created.
Click OK, then OK, to close the Map Local settings. Let’s execute another call to the search endpoint and see how it works.
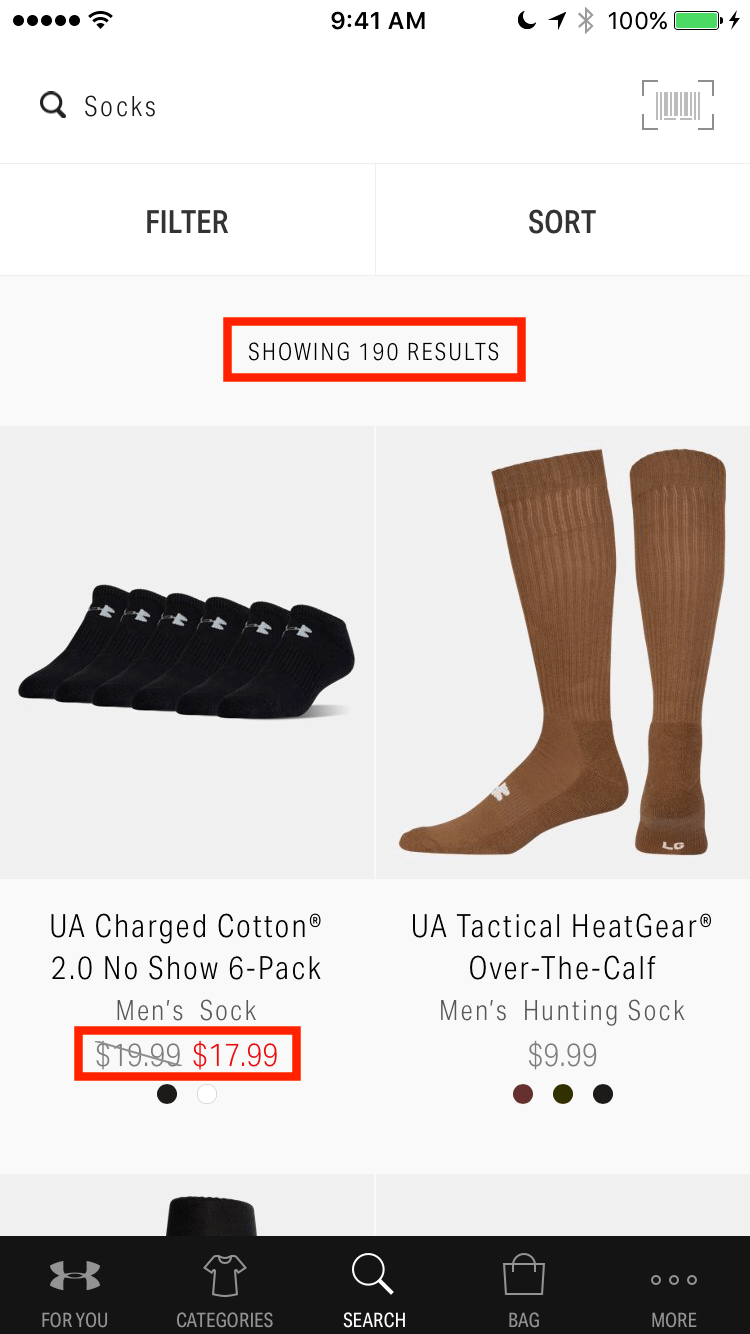
And there you have it! We can see the new totalCount reflected in the SHOWING 190 RESULTS element and that the first product is on sale for $17.99.
Network Throttling
Aside from observing and modifying various elements in our requests and responses, Charles is also incredibly useful for simulating various types of network connections, otherwise known as network throttling.
This can be an incredibly valuable tool for a tester as this will allow you to simulate the network conditions that various users of your app could experience in the real world. It’s one thing if your app behaves as desired when it’s being tested in your office with a fast Wi-Fi connection, but does it exhibit that same behavior when on a slow or unreliable network?
Throttling your network in Charles is very simple. Navigate to Tools > Throttle Settings… and select the Enable Throttling checkbox.
Note that you do have the option to enable throttling for select locations, but for the purpose of this example, we’ll enable throttling globally for all network traffic. Select a preset from the Throttle preset drop-down and click OK. It’s as simple as that!
If you’re unfamiliar with the terms used in Throttle Settings, I recommend doing some research on what each of these mean and experimenting with setting these in different ways. This will allow you to create your own presets based on the network settings that will best serve your testing.
In Closing…
While the previous examples have been simple and possibly even distanced from real-world scenarios, I hope you can see how the tools within Charles Proxy are very powerful when applied in the proper context, and I encourage you to continue to explore how you can leverage them in your own testing.
Please feel free to comment below should you have any questions!
انها معلومة مفيدة
Hello! Any changes needed for IOS 11 or 12? I ask because I REALLY want to do this but I get stuck on step 4. Basically after I add the proxy local IP address, I cannot access the URL for the SSL cert… specifically if I go to Settings, General, About, Certificate Trust Settings… I do not see this as one I can allow? I see Trust Store Version but nothing to allow or approve below that. Thoughts?
The only change iOS 11 and 12 introduced was the additional step of needing to enable trust for root certificates (Settings > General > About > Certificate Trust Settings) but from the sounds of it, you’re not getting that far because the certificate isn’t even installed for you to enable.
Make sure Charles is running and your computer and device are connected to the same Wi-Fi network. I would also note that if you’re doing this at work, there’s a slight chance your company’s corporate Wi-Fi security settings might interfere with what we’re trying to do. If this is the case, there are probably ways to work with your corporate security team to make Charles work, but let’s first rule this issue out by having you try it on a home Wi-Fi network as well.
Taking a look at step 4 again, you’re able to find where you enter the local IP address of your computer in iOS Settings > Wi-Fi > Configure Proxy > Manual, correct?
Once you have that configured, open iOS Safari and navigate to chls.pro/ssl. This should automatically prompt you to install the Charles certificate. Once installed, you should be able to then enable trust for that certificate in Settings > General > About > Certificate Trust Settings.
If you run into issues, please let me know where you were in the process and the details of what you’re seeing both on the mobile device and in Charles.
Fantastic breakdown and very handy for new users, I work in Mobile Games and been using Charles Proxy for some time, it’s invaluable for testing how the client handles modified requests and also gives us that insight to what the game is actually doing, giving that technical understanding.
Thanks
Thanks Jack – appreciate your kind words!
I navigate to chls.pro/ssl on my iphone at iOS safari
it said ‘safari cannot open the page because the network connection was lost’
This is most likely due to the Proxy Server and Port being entered incorrectly. Make sure your computer and iPhone are on the same Wi-Fi network and then double check your computer’s local IP address (Charles Help menu > Local IP Address) to make sure that you’ve entered that IP address correctly in iOS Settings > Wi-Fi > (your network) > Configure Proxy. The Port should be set to 8888 as long as the default port has not been changed in Charles. You can check that in Charles by selecting Proxy menu > Proxy Settings…
If you’re still having issues, can you tell me more about the network you’re connecting to? Does it make use of a Captive Portal or is it an Enterprise/Corporate network at your work (possibly having some network security “features” that are causing you issues – If so, are you able to test out the setup steps on a home network)? Are you able to connect to the internet and load web pages on both the iOS device and also separately on your computer without Charles in the picture?